
This is part three of the Small But Mighty Dragon crochet-along. In this part we will be making the tail, decorating it, and sewing the tail to the body.
Hvis du vil have mulighed, for at lave CAL'en på Dansk, så er det i denne gruppe
There are 3 videos for this part of the CAL. Video links are given in the pattern below.
Links to previous parts of the dragon are in the schedule here.
Abbreviations:
st = stitch
sc = single crochet
hdc = half double crochet
dc = double crochet
ch1 = chain one
sl st = slip stitch
2tog = crochet 2 stitches together
f/o = finish off
How to read the rows:
When working in the round, mark off the last st of row 2 and move that marker at the end of each row. Each row has a sequence. Example: 1sc then 2sc in next st means repeat that sequence 1sc then 2sc in next st followed by 1sc then 2sc in next st over and over to the end of that particular row. The number inside the parentheses ( ~ ) is the number of stitches you should have at the end of that particular row.
This video shows how to crochet the first 4 rows of the tail and how to sew the end of the tail’s edges closed.
Tail: using body color
1) magic circle with 6sc (6)
2-3) 1sc in each st for 2 rows
4) 1sc then 2sc in next st (9)
5-6) 1sc in each st for 2 rows
7) 1sc in next 2st then 2sc in next st (12)
8-9) 1sc in each st for 2 rows
10) 1sc in next 3st then 2sc in next st (15)
11) 1sc in each st for 1 row
12) 1sc in next 4st then 2sc in next st (18)
13) 1sc in each st for 1 row
14) 1sc in next 2st then 2sc in next st (24)
15) 1sc in each st for 1 row
16) 1sc in next 5st then 2sc in next st (28)
17-18) 1sc in each st for 2 rows
sl st next st and f/o leaving a long tail for sewing

End of tail: using body color
1) magic circle with 6sc (6)
2) 1sc in each st for 1 row
3) 1sc then 2sc in next st (9)
4) 1sc in next 2st then 2sc in next st (12)
5) 1sc in each st for 1 row
sl st next st and f/o leaving a tail for sewing. Sew the edges closed, sew just on the inside of the V's of the last row, this will give a clean edge. Bring the yarn tail to the middle of the last row when done. You will use this yarn tail to sew the End to the tail.
I added a little decoration to the surface of the End, see photos. This part is optional.
Pull the alternate color through, ch1 then add 1sc in the same space, 1hdc in the next space then sl st and f/o. Weave in yarn tails. Set aside until you have decorated the tail.


Decorate the tail:
This video shows how to crochet the raised ridge and how to crochet the decoration (spikes) on the tail.

Options for decoration:
Feel free to get creative with this part. You could play around with different stitches and combination of stitches. You can sew the tail onto the dragon before adding any decoration or after you add the decoration. Do what is easiest for you.
Taller spikes:
Adding a ridge (I talk about that in the next section) and then crocheting on top of that ridge gives you extra tall spikes, like on the Green Dragon. If you don't care about the height then you can crochet a simple line of hdc's or dc's, with a sl st or a sc between them, right onto the tail like I did for Anarya the Pink Dragon. The way I did the tail decoration for the Green Dragon is a bit more work with extra sewing.

This is how I did the decoration for the Green Dragon.
We crochet up the tail using sc, hdc and dc and then add spikes on top:
First, create a raised ridge to work on. Pull the same color through the end of the tail, ch1 and 1sc in each space up the tail. You should have about 17st going up the tail when you're done. Weave in yarn tails.
Pull the alternate color through the first st at end of the tail, ch1 then in the next st add 2hdc then sl st the next 2st. *ch2, in the next st put 2dc then sl st the next 2st. Repeat steps after * to the last st. If you had 17st like I did then you should only be able to sl st once after the last dc. Weave in yarn tails.
Sew the End to the Tail now.


You could leave the tail decoration as is or take it one step further and add Picot stitches across the tops of the dc's. I actually forgot I was going to add these and I sewed the tail to the body. It made it more difficult for me to hang onto so now is the time to add them!
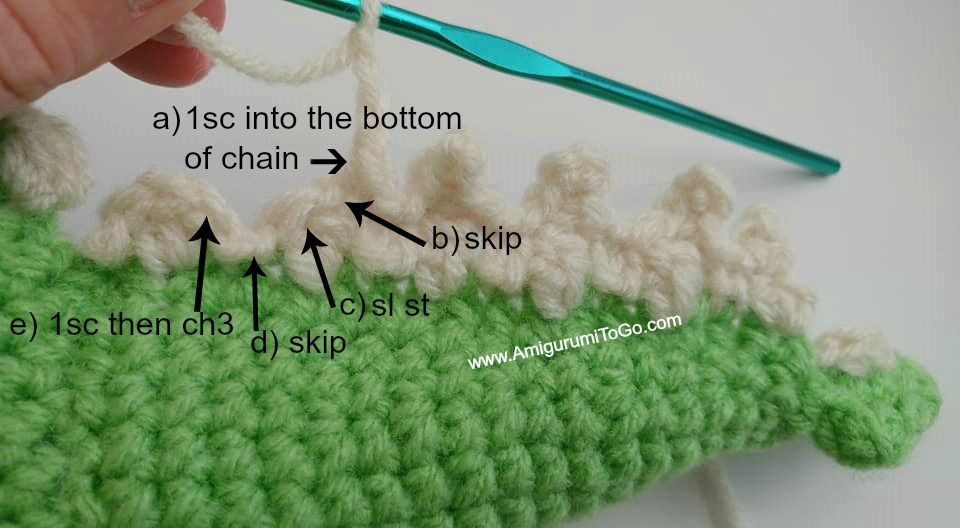
Pull the yarn through the beginning of the decoration, ch1 then 1sc in the next space, ch3 then 1sc into the bottom of the chain (the first ch). I believe a true Picot calls for a sl st into the bottom of the ch but a sc works well. Skip the next st, sl st the next st, skip the next st, 1sc into then next then ch3 and repeat until you have picots on top of all the dc's. f/o and weave in the yarn tails. After I was done that, I decided the End of the tail needed a Picot too, so I added one then connected it to the beginning of the tail's decoration using 1sc.
Stuff the tail up to the last 2 or 3 rows. Do not stuff to the edge. You need a bit of space between the stuffing and the body.

This video shows how to sew the tail to the body and how to crochet the decoration (spikes) up the back of the dragon.
Sew the tail to the back of the body,
Pin the tail in place, the top edge, not the ridge, should be on or about row 13. The bottom on or about row 2.
*Make sure the tail is centered. The first time I sewed mine on, it was all wonky and I had to cut it free. Save yourself the trouble of going through that by ensuring it is centered now.
Whip stitch around. Keep the stitches close together so the seam is neat and clean looking between the body and the tail.

Continue with the decoration,
Once the tail is sewn on, continue the decoration up the back. Create a raised ridge to work on, just as we did for the tail. Pull the same color through, ch1 then 1sc in the next 5 or 6 spaces. Weave in yarn tails. Pull alternate color through the start of the raised ridge, ch2 then add 2dc in the next 4 or 5 st, finish the row off with a sl st. f/o and weave in yarn tails.
Now connect the tail decoration to the back by pulling yarn through the tail decoration, ch1 and 1sc into a st of the back decoration, 1sc in the next st the ch3 and 1sc into the bottom of the chain then sl st the next few st. f/o and weave in yarn tails.


Congratulations to us all! We are now finished Part three of the schedule. You can post your photos on facebook in the comments of this post.
See you soon for part four!
Comments
Post a Comment