Print off the free written pattern for the Little Bigfoot Kitty here
ASSEMBLY:
Some people find sewing amigurumis together a bit daunting. I used to as well, I used to dread sewing things together! I enjoy it now. The trick is to relax, don't hold things so tight. Let the yarn needle do all the work. Use pins to hold things in place, use lots of pins when you can. Always make sure you are happy with the placement of things BEFORE sewing. Take your time and always take breaks when you need them. Enjoy!
1) Flatten the foot before sewing any parts. Cut 2 yarn tails, about 12 inches long or so, the same color as the foot. Thread 1 strand of yarn with your yarn needle, bring one end through the middle circle of row 1 and out through the top of the foot, in between row 8 and 9, and then wrap the yarn over about 2 or 3 stitch holes and back down into the foot and out the middle circle, just a bit so that when you knot it off the knot doesn't pull through the circle.
Pull the yarn tails until you have flattened out the foot as pictured. Knot off and hide the yarn tails inside foot.
I borrowed the foot photos from another pattern of mine, the feet you made now will be much smaller than these one pictured.


For the standing kitty, pin the legs side by side first to make sure there's enough room for the 2nd one once you sew the 1st one on. Remove one then sew the other in place. Sew the edge, all around the leg, to the body. Knot off anywhere when done and hide yarn tail inside body. Sew on 2nd leg.


3) Sew the arms on or about row 22 (or 2 rows under the start of the neck). Knot off and hide yarn tails inside body.
4) Sew the tail on. I sewed the tail so that it sits to the side.
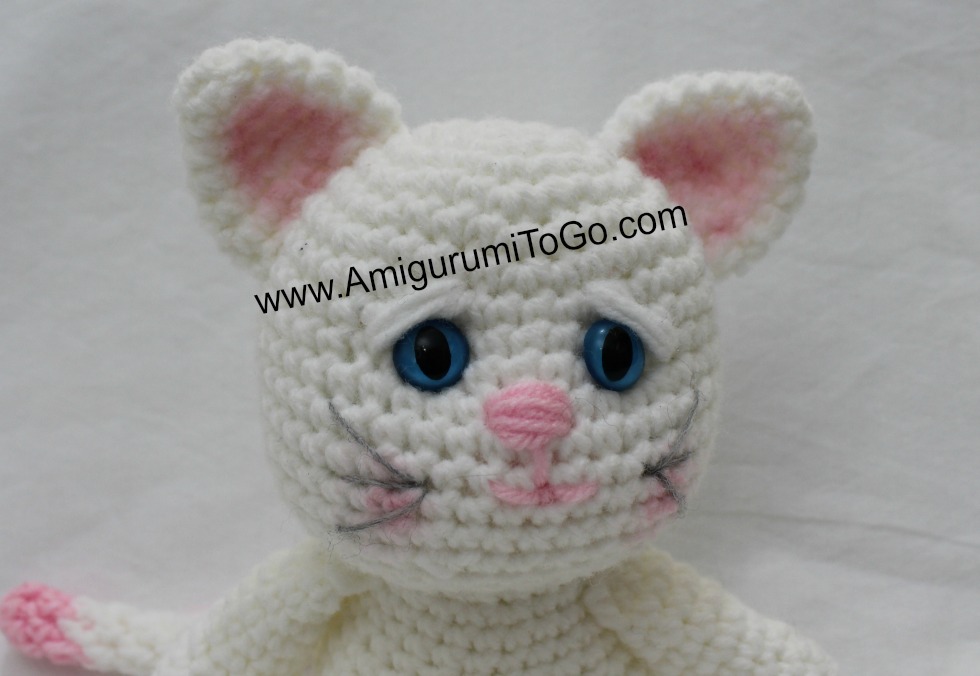
Knot off and hide yarn tail inside body. 5) Sew the ears on. Sew them in line with the arms. The top edge of the ear should be in between row 4 and 5 and the bottom edge in between row 10 and 11. Knot off when done and hide yarn tails inside head.


6) For those adding yarn for eyes. Insert yarn through the side of the head and come out where the the first eye will be. The ones pictured are wrapped vertically over the 11th row. Wrap until you are happy with the size then bring the yarn tail inside the head and out where the 2nd eye should be. The ones pictured have 8 visible stitch holes between them. Knot off and hide yarn tails inside head. I add a dot of white paint to give the eyes some life.
7) Add the nose and mouth. Insert yarn through the side of the head and come out where the nose should be. Wrap a few times, then bring it down to make the mouth. Once you are done, knot off (I normally knot off right between the smile lines then hide the yarn tail inside the head.

8) Add the whiskers but before you do that, you can add a bit of blush cheeks for some color if you made a white kitty. Start lightly and build up the color. I use a q-tip to rub it in. You can also add some blush to the ears too.
I split a strand of yarn to make the whiskers pictured.
You're done! I hope you enjoyed the pattern...
Copyright 2017 Author: Sharon Ojala - Amigurumi To Go, All rights reserved
Sharon, I've learned so much from your tutorials and videos. I love your LBF patterns and I'm currently making the LBF Kitty to join the Puppy, the cow, the horse, the Dress Me Bunny and the Elephant. My granddaughter is going to be overwhelmed with crochet critters for her 2nd birthday.
ReplyDeleteThank you Sharon for patterns and tutorial videos etc.
ReplyDelete