
Little Bigfoot Giraffe 2014,
I think I love him! One more Little Bigfoot pattern gets revised, updated and given it's own video tutorial.
Size,
Stands 13 inches from horn to toe. That's quite the size difference from the original pattern of 2012. I can't totally remember the exact height but I think he was about 8 inches tall. See the original here

See all the patterns in the LBF series here
Translations,
Spanish by, The Lyanne Ties here
Copyright 2014 Author: Sharon Ojala - Amigurumi To Go, All rights reserved
Supplies:
Worsted weight yarn in any color
4.5mm hook *use a smaller hook if you see gaps in your stitches
blunt end yarn needle for sewing
scissors
polyester stuffing
2 pipe cleaners to stabilize the neck
felt, paint, buttons, or yarn for eyes (any size eyes can be used but I used 7.5mm safety eyes and 8mm oval buttons)
This pattern uses the following stitches:
st = stitch
sc = single crochet
hdc = half double crochet
sl st = slip stitch
2tog = crochet 2 stitches together
f/o = finish off

Click here for Full Video Tutorial ~ Video was filmed in the following order:
- Introduction
- How to make the head and body ~ includes when and how to stuff and adding spots
- How to make the muzzle, ears and horns
- How to make the arms, legs and tail
- arms, legs
- sew on tail
- muzzle
- horns then ears
- add in nostrils and the mouth
- tutorial for different eyes
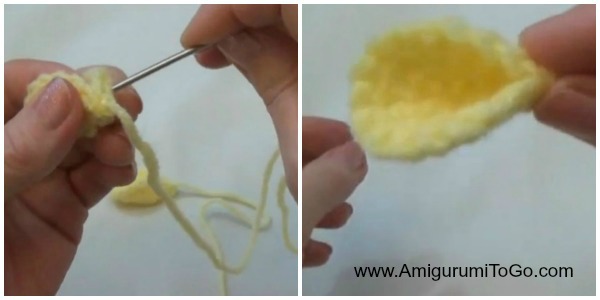
SPOTS: Depending on the colors you choose, you can add in the spots as you go along but if you use yellow with brown spots then it's best to add in the spots after the doll has been stuffed and closed. I show how to do both methods in the video tutorial. View video at 12:51 for how to add them before it's stuffed and hear the reasons why it might be best to wait until it's stuffed and view at 28:04 on how to add in the spots after the doll has been stuffed.

Starting at the top of the head working down to bottom of body: with yellow
1) magic circle with 6sc (6)
2) 2sc in each st (12)
3) 1sc then 2sc in next st (18)
4) 1sc in next 2st then 2sc in next st (24)
5) 1sc in next 5st then 2sc in next st (28)
6-10) 1sc in each st for 5 rows
11) 1sc in next 6st then 2sc in next st (32)
12-14) 1sc in each st for 3 rows
15) 1sc in next 2st then 2tog (24)
16) 1sc in next 2st then 2tog (18)
17) 1sc then 2tog (12)
Stuff head, shape as you stuff. See video (time at 20:46) for tips on stuffing
18-25) 1sc in each st for 8 rows
26) 2sc in each (24)
27-29) 1sc in each st for 3 rows
30) 1sc in next 3st then 2sc in next st (30)
31-33) 1sc in each st for 3 rows
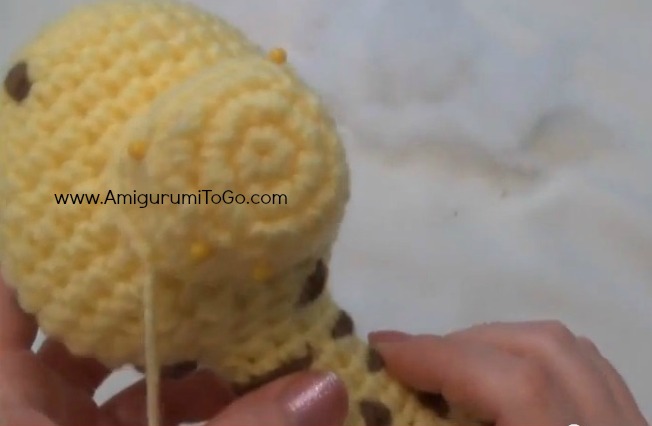
Add in pipe cleaner to stabilize the neck. I sewed one pipe cleaner on each side of the neck. View video at 24:52 on how to do this
34) 1sc in next 3st then 2tog (24)
35) 1sc in next 2st then 2tog (18)
36) 1sc then 2tog (12)
Stuff body firmly and shape as you stuff
37) 1sc then 2tog (8) stuff more if needed
38) 2tog twice and f/o. Weave yarn tail in and out the remaining stitching and pull tight to close the gap. Knot off and hide yarn tail in body. You can add in some spots now. View video at 34:30 for tips on adding in the spots.
Muzzle: with yellow
1) magic circle with 6sc (6)
2) 2sc in each st (12)
3) 1sc then 2sc in next st (18)
4-6) 1sc in each st for 3 rows
sl st next st and f/o leaving a long tail for sewing. You can add in a mouth and nostrils before sewing muzzle to head. Sew most of the muzzle in place then stuff before sewing on completely.
Horns: with brown
1) magic circle with 6sc (6)
2) 2sc in each st (12)
3-4) 1sc in each st for 2 rows
5) 1sc in next 2st then 2tog (9)
6) 1sc then 2tog (6)
7-9) 1sc in each st for 3 rows
sl st next st and f/o leaving a long tail for sewing.
Stuff the ball part of the horn. Do not stuff the stem of the horn.
Ears: with yellow
1) magic circle with 6sc (6)
2) 2sc in each st (12)
3) 1sc then 2sc in next st (18)
sl st next st and f/o leaving a long tail for sewing. Fold ear and then whip stitch the one end. It takes only 2 stitches to hold the ear shape.
1) magic circle with 6sc (6)
2) 2sc in each st (12)
3-4) 1sc in each st for 2 rows
5) 1sc in next 2st then 2tog (9)
6) 2tog , switch colors on next st, sl st next st, 1sc in next 5st (8)
7-12) 1sc in each st for 6 rows
13) 1hdc in next 4st, sl st next st and f/o leaving a long tail for sewing. Stuff hand, lightly stuff arm. Add in spots. (See video at 50:55 for stuffing tips and also how to add in the spots)
Legs: starting with brown
1) magic circle with 6sc (6)
2) 2sc in each st (12)
3) 1sc then 2sc in next st (18)
4-5) 1sc in each st for 2 rows
6) 1sc in next 16st, switch colors in next st then sl st next st (18)
7) (2tog then 1sc in next st, repeat 4 times) 1sc in next 6st (14)
8) (2tog then 1sc in next st, repeat 3 times) 1sc in next 5st (11)
9) 2tog then 1sc in next 9st (10)
10-14) 1sc in each st for 5 rows
sl st and f/o leaving a long tail for sewing. Stuff & shape foot (tips on stuffing at 59:54) stuff leg.
Tail:
ch 10 with yellow begin with a long starting yarn tail and f/o leaving a long tail for sewing
weave in and out along the chain with a long strand of brown yarn, starting at one end and once you reach the other end loop the brown yarn around your finger then weave in and out along the chain all the way back to the beginning. Do this step 3 times. You should have 3 loops on your finger when done. Now weave the yellow yarn tail, the one you f/o with down the chain. You should now have 4 strand of yarn at one end. 2 yellow and 2 brown. Cut the loops and run a yarn needle through each strand to fray them. For tail tutorial see video at 1:01:20
Assembly:
If you assemble the doll in the order I give you then you will not have to worry so much about centering the different parts as much.
1) Sew the arms on. The top of the hdc's get sewn onto the 27th row
2) sew on the legs. I sewed them on in a way the doll stands up.
3) sew on tail
4) sew on the muzzle (top of muzzle sits just above the 11th row).
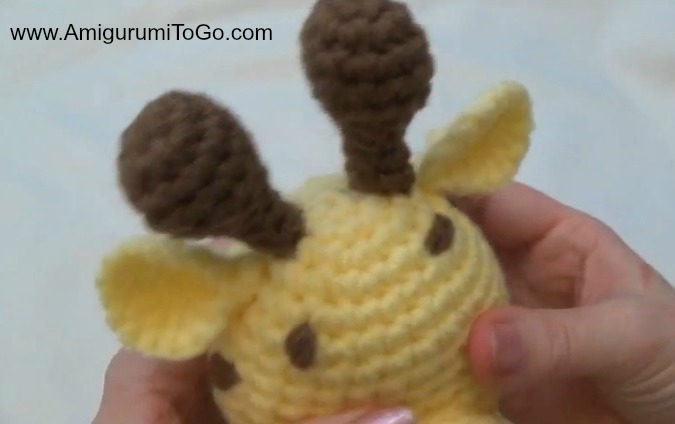
5) sew on the horns (the space between them is up to you) then the ears 1 row below the horns.
6) add in the fir to the back of the head and neck. I rooted each strand in (see video at 1:22:03)
7) add in the nostrils, mouth then the eyes. I put the eyes in between the 9th and 10th.


I hope you enjoyed this pattern!
Why donating is important and my thank you here.
Why donating is important and my thank you here.
Dear, i would love to translate your pattern into german and set it to our secret crocheting group on facebook. One of the members found your page and asked for help with translating. We will not sell any of your stuff and not sell any pattern. You may contact me under c.maina@gmx.de Thank you
ReplyDeleteHi Cathrin,
DeleteI don't mind you translating the pattern. Would there be anyway to make the translation public? I could post it here with credit to the translator or provide a link to the translation?
There is a translation I use I could post the link for you Sharon Ojala,
ReplyDeleteyes Jeannie.. if there is a better translator than the google one I have available here at the top right hand side of this page that would be great :)
DeleteThank you so much for your patterns of the little big foot animals. I am making an elephant, monkey and hippo for my niece's baby, The comforter is in the jungle theme. They are so cute. Your tutorials are so helpful and so well done. Thanks again!
Deletethank you so much for your lovely patterns!!!!!!
ReplyDeleteThank you so much for this (and all your tutorials, I can't stop looking at them)! I have a question.. if I'd like to make this giraffe into an unicorn (or horse) how many rounds do you recommend for the neck ?
ReplyDeleteI honestly don't know.. I design by what I see as it's coming along if that makes sense. Today I actually posted a unicorn on my facebook page, Amigurumi Freely. It's not my design but it's super cute. You can also look on my pinterest boards for more free patterns like unicorns and horses. Look to the top and right hand side of my blog page for the direct links to my other sites. Hope that helps :)
DeleteI made 5 rounds to neck of my horse, buy also I used crochet 2 mm so my pony is really small :)
DeleteThank you Sharon, going to check right away :)
ReplyDeleteHow lucky am I that you posted one today? ;)
thaaaaaaaaaaank you very much
ReplyDeleteOBRIGADA, MUITO OBRIGADA por dividir conosco o que voce sabe fazer de tão lindo!\Deus te abençoe muito bj kharin
ReplyDeletekharinfuchs@gmail.com
poa- Brasil
He's gorgeous - I've nearly finished one now, and I have made other bigfoots (or bigfeet?) before. I really like the pipecleaner neck. Like most good ideas its simple but works very well. I may use it for dolls too. Thanks so much
ReplyDeleteDo the spots on the giraffe come from variegated yarn? or do you switch to brown yarn randomly? Or....what?
ReplyDeleteif you scroll up to the start of the pattern itself, just above the picture there I explain the spots and I also note the time in the video where I do the spots. There's 2 different methods so read through the entire spot explanation
DeleteI have made 5 or 6 of these gorgeous giraffes. I'm getting faster too. LOL I can now make the head and body in 2 1/2 to 3 hours. (for me, that's good).
ReplyDeleteIn the pattern and the tutorial, you put pipe cleaners in the neck to keep it somewhat rigid. I tried that and was really disappointed with the result as the head flopped about. My husband came up with what I think is a brilliant idea.
Instead of all stuffing in the head, he suggested a little stuffing first, then a polystyrene foam ball so the head keeps its shape but is lighter.
Then to keep the neck rigid, he made me some loops of stainless steel wire to use.
I put a slit in the bottom of the foam ball and pushed in the part of the wire loop that was bent over to avoid scratching anyone, then a few drops of glue to hold it in.
Voila! The results are VERY pleasing to me. The loops are about 3 1/2 inches long and about 3/4 of an inch wide. We tried aluminum wire, but too much bending and it breaks.
Thanks for suggestion, I just finished giraffe and too was a little disappointed with head/neck. IF I attempt to do another will use your hubby idea. Tksm
DeleteBom dia Sharon!!!!!
ReplyDeleteVim agradecer e aproveito para deixar o link do meu Blog, para você ver a Giraffe Crochet que fiz......baseada em sua vídeo aula, que é muito bem explicada!!!!!! Bjs!!!!!
http://anabellebrasil.blogspot.com.br/2015/01/girafinha-de-croche.html
Did one, loved your tutorial easy to follow !thank you, baby gift for a family .��
ReplyDeleteCan I buy a giraffe sry I'm from swizerland
ReplyDeleteI don't sell finished items, sorry
DeleteOk but if u don't need 1 anymore can I have it pls pls pls pls? :D
ReplyDeleteThe giraffe is to hard for me to make and giraffes are my favorite animals :,(
ReplyDeletedid you try following along with the video?
DeleteYes
ReplyDeleteYour the best instructor i have ever watched, thanks to you i understand so much better. It was like a light bulb coming on. I can't thank you enough. Forever grateful , Nora.
ReplyDeleteI was wondering if you have plans for a bigfoot puppy?
ReplyDeleteMy granddaughter loves your bigfoot ami's and has been asking for a puppy.
thank you for all the wonderful patterns.
Hi, Sharon. This giraffe is absolutely adorable! I was wondering approximately how much yellow yarn is needed, as I would like to have a go making sure I have enough yarn before I start. Thanks!
ReplyDeletei made these giraffes and they are seeming to get smaller every time but i am following the same pattern did you change anything or do you have any tips on how to fix this?
ReplyDeletenope, didn't change anything. Could you be using a smaller hook or lighter weight yarn? Those 2 things could make the item smaller.
DeleteMany many thanks for the tutorial, I am a beginner although i did it easily just by following ur steps,
ReplyDeleteI loved this pattern. I made two: one joining rounds and the other as written. i tend to modify patterns due to the fact that I rarely repeat the same proyect twice but I love that the head neck and body is worked as one piece. Gonna work on the Little Bigfoot monkey later on. Thanks for your awesome patterns!
ReplyDeleteIs it better to add the spots as you stuff or wait and do the spots last?
ReplyDeleteit's been over 2yrs since I made this guy so I can't tell you for certain off the top of my head, I just don't remember but it's all in the pattern.
DeleteIf you scroll up, just above the start of the written pattern,(where it says in red, "Starting at the top of the head working down to bottom of body"), just above that there's a photo, look above that photo with the heading in red "SPOTS", I give some tips there.
Then again at the bottom of the body, in row 38 I give more advice and also list a time in the video that will be helpful for adding spots.
Thanks for asking :)
I would like the pattern for giraffe in the the frame but its in a different language is there any way we can translate that
ReplyDeletei want to make him bigger, if i use a bigger hook will that make him bigger? or just mess up the patteren?
ReplyDeleteyes, I show how to right here Easy Way To Enlarge Amigurumi
ReplyDeleteThese are so cute, and so perfect for little arms to hold and little hands to drag around! So sweet of you to share the pattern.
ReplyDeleteHey love your videos and would love to show my work to you but can not find you on facebook. You can find me at cindy slaughter butler.
ReplyDeletethe facebook page is: https://www.facebook.com/AwesomeAmigurumi/
Delete:)
Can you suggest some other material to stabilize the neck. I'm making this for a toddler. Thank you! She loves the little animals.
ReplyDeletejust stuff it firmly and it should be fine, the neck isn't super long so it won't be that floppy
DeleteThank you!
Delete