
UPDATE!! 2014 I revised this pattern with a video tutorial here
This pattern is now retired and no longer will receive any pattern support if it's needed. Please use the revised pattern. To view this original pattern from 2012 keep scrolling down this page.
Copyright 2011 Author: Sharon Ojala - Amigurumi To Go, All rights reserved
st = stitch
sc = single crochet
BLO = back loops only
2tog = 2 stitches together
ch1 = chain one
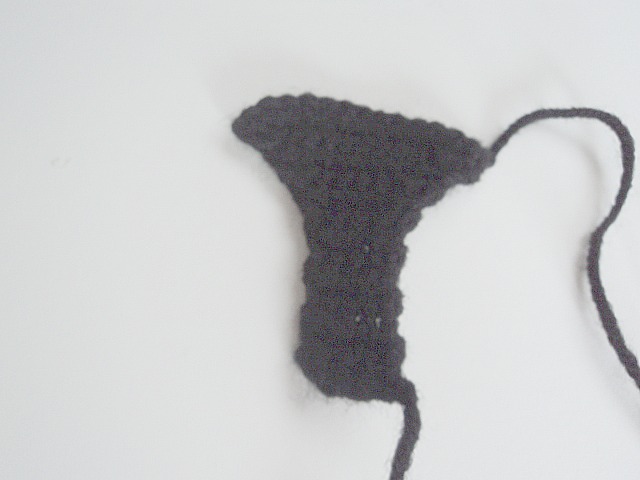
HEAD: Make 2
1) Chain 11
2) 1sc in each chain starting with the 2nd ch from the hook (10)
3) ch1 turn, 1sc in each st (10)
4) ch1 turn, 3sc in the 1st st, 1sc in the next 8 st, 3sc in the last st (14)
5) ch1 turn, 1sc in each st (14)
6) ch1 turn, 1sc in each st (14)
7) ch1 turn, 2sc in the 1st st, 1sc in the next 12 st, 2sc in the last st (16)
8) ch1 turn, 1sc in each st (16)
9) ch1 turn, 1sc in each st (16)
10) ch1 turn, 2tog then 1sc in the next 12 st then 2tog (14)
11) ch1 turn, 2tog then 1sc in the next 10 st then 2tog (12)
12) ch1 turn, 2tog then 1sc in the next 8 st then 2tog (10)
13) ch1 turn, 2tog then 1sc in the next 6 st then 2tog (8)
14) ch1 turn, 2tog then 1sc in the next 4 st then 2tog (6)
15) ch1 turn, 2tog then 1sc in the next 2 st then 2tog (4)
16) ch1 turn, 2tog then 2tog (2)
17) ch1 turn, 1sc in the 2 remaining st (2)
Finish off, leave a long tail for sewing
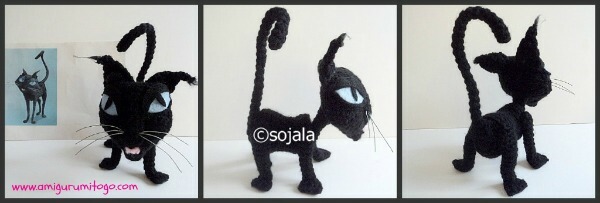
Sew the 2 pieces together, starting from the mouth area and work up. Leaving an opening on the top of the head for stuffing. You want to stuff from the top down towards the mouth. Close up once you have the stuffing in and the shape you want. Take a look at pictures of the cat to stuff and shape accordingly.

NOSE:
1) Chain 5
2) ch1 turn, 1sc in each chain starting with the 2nd ch from the hook (4)
3-6) 1sc in each st for 4 rows. Remember to ch1 and turn at the end of every row (4)
7) ch1 turn, 2sc in the 1st st, 1sc in the next 2 st, 2sc in the last st (6)
8) ch1 turn, 1sc in each st (6)
9) ch1 turn, 3sc in the 1st st, 1sc in the next 4 st, 3sc in the last st (10)
10) ch1 turn, 1sc in each st (10)
11) ch1 turn, 3sc in the 1st st, 1sc in the next 8 st, 3sc in the last st (14)
12) ch1 turn, 1sc in each st (14)
Finish off
Lay the nose over the face, it will not fit length ways but the top part will fit end to end across the top of the head. Pin in place at the top and sew across the top starting at one end and work toward the center, leave an opening for stuffing, now start at the other end and towards the center. You want to stuff from the top downwards as you did for the head so leave an opening. Once the top is sewn in place start sewing around the nose pulling the nose downwards a bit (not too much) and make sure you keep the nose centered as you pull and sew. Stuff and shape and then close up that opening at the top.

EYES, NOSE & WHISKERS:
The eyes I cut from light blue felt. The shape is very important to get that creepy look. I cut 4 pieces, glued 2 together to give the eye some depth and then glued onto face. Cut an eyelid from black felt and carefully glue that over top of eye, same goes for the pupil. I also cut a length of black yarn and very carefully glued that under the eye to finish the eye off nicely!
The nose I made by stitching in pink yarn. Whiskers are important too for the overall look of the cat, I used thin wire and pushed each one through the nose.


BODY:
1) magic circle with 6sc (6)
2) 2sc in each st (12)
3) 1sc in the 1st st then 2sc in the next st, repeat around (18)
4) 1sc in the next 2 st then 2sc in the 3rd st, repeat around (24)
5-7) 1sc in each st for 3 rows (24)
8) 2tog then 1sc in the next 2 st then 2tog (18)
9-13) 1sc in each st for 5 rows (18)
14) 1sc in the next 2 st then 2sc in the 3rd st, repeat around (24)
15-16) 1sc in each st for 2 rows (24)
17) In the BLO, 2tog then 1sc, repeat around for 1 row
Before the hole gets too small you need to stuff the body. I recommend that you stuff the body with pellets or grains of rice. This will keep the cat from flopping over when you stand it up, the head sits away from the body which makes it top heavy. I took some light fabric and stuffed it in the body making sure to line the entire body completely so nothing could escape then filled it with grains of rice. I then dropped in some hot glue and folded the fabric over to seal it up like a pouch.
18+) In the BLO 2tog until you are left with 7 st (7)
continuing on now with the neck
Neck: 1-5 ) 1sc in each st for 5 rows
Neck: 6) 1sc then 2sc in the next st, repeat around (10)
Take a pipe cleaner and fold it over a couple times and trim excess. You want the pipe a bit longer then the neck itself. Glue a small piece of felt to each end of the pipe cleaner, push it into the neck and now you can sew it to the back of the head. The felt pieces will keep the pipe cleaner from working any holes inside the cat.

EARS make 2:
1) chain 7
2) 1sc in each ch starting with the 2nd ch from hook (6)
3) ch1 turn, 1sc in each st (6)
4) ch1 turn, 2tog then 1sc in the next 2 st then 2tog (4)
5) ch1 turn, 1sc in each st (4)
6) ch1 turn, 2tog twice (2)
7) ch1 turn, 1sc in each st (2)
8) ch1 turn, 2tog (1)
(9) 1sc in the remaining st
finish off. Sew on head. Look at pictures first and determine how you want the ears to sit on the head. Sew on accordingly. I tied a bit of yarn to each end of ear and frayed the ends to give it a ratty sorta look.


LEGS make 4:
1) magic circle with 6sc (6)
2) 1sc in each st (6)
3) 2sc in the 1st, then 1sc in the next 5 st (7)
4) 2sc in the 1st, then 1sc in the next 6 st (8)
5-6) 1sc in each st for 2 rows
7) 2tog then 1sc in the next 6 st (7)
8) 1sc in each st (7)
9) 2tog then 1sc in the next 5 st (6)
10) 1sc in each st (6)
11) 2tog then 1sc in the next 4 st (5)
12) 1sc in each st (5)
13) ch1 turn, 1sc in the next 4 st
14) ch1 turn, 1sc in the next 4st
finish off. do not close up the leg and do not stuff


ASSEMBLY OF LEGS:
Shape the body a bit more with your fingers. Work that stuffing around in there until you are happy with the shape. Pin the legs on as pictured and sew on. You want to sew on with the same yarn you have been working with. Whip stitch them to make the legs "one" with the body.


TAIL:
1) magic circle with 6sc (6)
2-3) 1sc in each st for 2 rows
4) 2tog then 1sc in the next 4 st (5)
5-24) 1sc in each st for 20 rows
25) 2sc in first st then 1sc in the next st (8)
26-27) 1sc for 2 rows (8)
Finish off.


Love this cat pattern, thanks for sharing!!!
ReplyDeleteI hope I can make it soon! Thanks for sharing!
ReplyDeleteThank you!! And you're welcome :)
ReplyDeleteI have video tutorials posted for this cat on youtube, called "The Ghost of Wuss Puss". You can find the links on the right side of this page under the heading "My Youtube Tutorials"
I love your pattern soooo much , but tried for over an hr to print it somehow.... even tried to paste this to word doc. Could be my pc... any idea's for me, I would LOVE to make this kitty so much!! thankyou for your time and lovely pattern, blessings , Suzanne
ReplyDeletesmartinbc@hotmail.com
Hi Suzanne! I just sent you an email with a doc you'll have to download. Let me know if that works
ReplyDeleteSharon :)
Thankyou Sharon, worked fine, just have to refer to the website for pictures, or tutorial .
ReplyDeletethanks again! Suzanne
Great Suzanne! And I got your wonderful email as well... many blessings to you and your family.
ReplyDeleteHappy New Year!
XO
Love this kitty - change the eyes to green, and it is my mom's year old kitten. TFS,
ReplyDeleteWould it be possible to have directions sent to me that I could print? I love this pattern and the Coraline pattern, too. I love them all!!!! You are so creative and they are precious.
ReplyDeleteHi gege! I could send them to your email address or you can copy and paste to wordpad or notebook and print them off that way. Let me know :)
ReplyDeleteHey Sharon my Cat is finished :-)
ReplyDeleteIf you want take a Look at my (new) Crochet-Blog
http://an-makes.blogspot.com/2012/02/friend-for-coraline.html
Best wishes An
Thank you An!! Love the dolls you made, I am so happy to see them :)
ReplyDeleteAll the best to you and love your blog
Sharon XX
halloween cat
ReplyDeleteOh my goodness! My Coraline obsessed sister will just freak for this! I want to make this cat but also the Coraline that is in the picture with him. Do you have the pattern for her on your blog? I'd really appreciate it. Thank you!
ReplyDeleteI'm so silly. Right after I posted my first comment, I did a simple search on your blog and boom! There was the pattern for Coraline. Thanks for such awesome patterns!!
ReplyDeleteHi Elizabeth! You're very welcome. Don't feel silly, it's a large blog with a lot of content on one page and if you aren't familiar with the blog it will take a bit of time to take it all in. I'm glad you found the patterns you were looking for :)
DeleteHappy Crocheting!
Sharon xo
Dear Sharon, I really admire you and your talent, I love your patterns , tried Coraline, but her hair got the best of me. I am going to try again and will probably use a skull cap in the color of the hair. Wish me luck. Evelyn
ReplyDeleteThank you so much Evden! Sorry to hear of the hair troubles. The video didn't help?
DeleteI do wish you the best of lick with the skull cap! Keep me posted on how it all goes for you :)
Sharon XO
Hi Sharon.. I love your work.. I just did Coraline for my son.. (he's 4).. he absolutely loves her!!! I was just wondering if you had a video for the cat? I checked your youtube page.. & found one.. but it has no voice.. just music.. thanks again.. =)
ReplyDelete~Kristi
Hi Kristy! Glad to hear you are enjoying the patterns.. yes I did have a full tutorial up but it was flagged for having copyrighted music in the background, lol so to keep myself from getting into problems I just removed them and I thought there was a message on the first one that there will be another tutorial posted I just have to get it filmed. I'll post back and let you know once I do that. Thanks for the message :))
Deleteso I really like this pattern over the new and improved but on the tail it looks like you go from 6 to 4 with only 1 decrease which would make it 5 around ... I was wondering if its 5 around or 2 decreases?
ReplyDeleteit is 5st. I fixed that and the next 2 rows. I can't remember now how I ended those last couple of rows but I did my best guess. It was released in 2011 so it's been a while. I went over this pattern and revised each part this year
DeleteThank you so much I went ahead and fixed the following round accordingly and it looks super cute ... just have to sew the legs and tail on and finish the face ... I am so excited ... I will post a picture next week :)
ReplyDeletethat's great! I look forward to seeing it :))
DeleteWhat an awesome project. I've almost finished the cat and deciding what character to do next. Your pattern is easy to follow and the video has answered any question I had. Bravo on your great work! By far the most well put together instructional pattern I've come across. Keep up the good work!
ReplyDeleteGracias por compartir, eres fabulosa.
ReplyDeleteThis cat is fabulous! I saw it on Ravelry and, although it's above my skill level, I had to come get a better look. Thanks for creating it!
ReplyDelete