
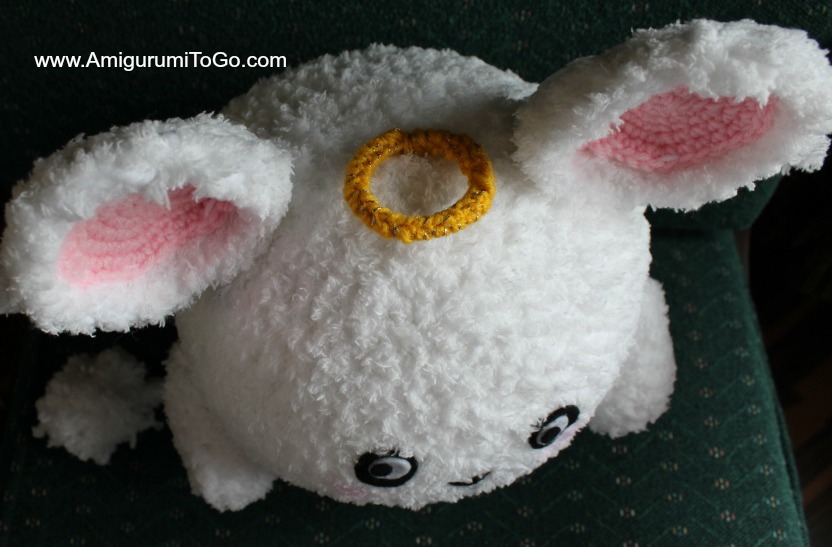
Mary the Angel Mouse,
I made this for my mother as a Christmas gift. She has long hated my mice and rat creations that I make for my dollhouses. I show them regularly on my other fb page here. Well, hate is a strong word, I should really say instead, she's just so creeped out by them! lol She really is. She can't handle real ones OR fake ones!
I decided to make her a mouse she can really love. One that's soft and fluffy and one that can't creep her out. I thought a loving Angel Mouse was just the thing to melt that heart of hers and it did! When she opened her present she said, "awwwww" Then she hugged her Angel Mouse tight. Yay!
PLEASE NOTE: With all that said, I didn't take pictures along the way of different parts while I made the mouse. It's just super hard to get good photos of separate pieces while using fluffy white yarn. This isn't a pattern for a beginner because the stitches are hard to see. It also requires some experience when sewing it all together. If you're just starting out in amigurumi making, I'd hate for you to get frustrated and this pattern might frustrate you. I did include as many photos and instructions in the assembly section. Be sure to read over these parts before putting your mouse together.
The mouse is about 13 inches to the top of the ears and a whopping 28 inches around the middle depending how much you stuff her.
How To Print The Pattern:
Use the free service found here.
Supplies:
1 roll of worsted weight yarn in white about or less than 364 yds (I used Red Heart Comfort yarn)
small amount of worsted weight yarn in pink for the inner ears (I used Red Heart Comfort yarn)
1 big roll (300 yards) of Bernat Pipsqueak in White
a small amount of yellow yarn and golden thread if you have it
6.5mm hook
4mm hook for the inner ears and halo only
blunt end yarn needle for sewing
scissors
polyester stuffing. You will use lots but less than a 16oz bag
white and black felt for eyes
hot glue for the felt
long dress maker pins OR bobby pins (hair pin). Regular stick pins do not hold the pieces together very well.
blush and a q-tip to add on cheeks if desired
Abbreviations:
st = stitch
sc = single crochet
2tog = crochet 2 stitches together
f/o = finish off
How to read the rows: Each row has a sequence as given below. Example: 1sc then 2sc in next st means repeat that sequence 1sc then 2sc in next st followed by 1sc then 2sc in next st over and over to the end of that particular row. The number inside the parentheses ( ~ ) is the number of stitches you should have at the end of that particular row.
Add in a marker at the end of row 2 and move that marker at the end of every row.
Starting at the top of the head holding reg yarn and pipsqueak yarn together. Use a 6.5mm hook for all unless otherwise stated: NOTE: Please see assembly section below before sewing any parts together.
1) magic circle with 6sc (6)
2) 2sc in each st (12)
3) 1sc then 2sc in next st (18)
4) 1sc in next 2st then 2sc in next st (24)
5) 1sc in next 3st then 2sc in next st (30)
6) 1sc in next 4st then 2sc in next st (36)
7) 1sc in next 5st then 2sc in next st (42)
8) 1sc in next 6st then 2sc in next st (48)
9) 1sc in next 7st then 2sc in next st (54)
10) 1sc in next 8st then 2sc in the next st (60)
11-20) 1sc in each st for 10 rows
21) 1sc in next 8st then 2tog (54)
22) 1sc in each st for 1 row
23) 1sc in next 7st then 2tog (48)
24) 1sc in each st for 1 row
25) 1sc in next 6st then 2tog (42)
26) 1sc in next 5st then 2tog (36)
27) 1sc in next 4st then 2tog (30)
28) 1sc in next 3st then 2tog (24)
stuff the doll now, it will take lots of stuffing. Shape as you stuff. The body should be nice and fat when done but not stiff.
29) 1sc in next 2st then 2tog (18)
30) 1sc then 2tog (12)
f/o leavening a tail for sewing. Weave in and out of the remaining stitches. Before closing the gap, add more stuffing. Once you're done stuffing, pull the yarn tail to close the gap. Knot off and hide the yarn tail in the body.
Outer Ears holding reg yarn and pipsqueak yarn together:
1) magic circle with 6sc (6)
2) 2sc in each st (12)
3) 1sc then 2sc in next st (18)
4) 1sc in next 2st then 2sc in next st (24)
5) 1sc in next 3st then 2sc in next st (30)
6) 1sc in next 4st then 2sc in next st (36)
7) 1sc in next 5st then 2sc in next st (42)
f/o leaving a long tail for sewing.
Inner Ears with 1 strand of pink and 4mm hook:
1) magic circle with 6sc (6)
2) 2sc in each st (12)
3) 1sc then 2sc in next st (18)
4) 1sc in next 2st then 2sc in next st (24)
5) 1sc in next 3st then 2sc in next st (30)
6) 1sc in next 4st then 2sc in next st (36)
f/o leaving a long tail for sewing. Sew inner ears to the outer ears.
Arms holding reg yarn and pipsqueak yarn together:
1) magic circle with 6sc (6)
2) 2sc in each st (12)
3-9) 1sc in each st for 7 rows
f/o leaving a long tail for sewing. Stuff hand area, very lightly stuff arm.
Legs holding reg yarn and pipsqueak yarn together:
NOTE: you can work the starting yarn tails into the 2nd row. Or just leave them hanging then tuck them in between the body and the leg when you sew the legs to the body.
1) magic circle with 6sc (6)
2) 2sc in each st (12)
3) 1sc then 2sc in next st (18)
f/o leaving a long tail for sewing. Stretch out with your fingers before sewing legs to the body.
Tail holding reg yarn and pipsqueak yarn together:
1) ch 31 begin with a long enough starting tail you can sew into the body
2) 1sc in each ch across (30)
f/o leaving a tail for sewing
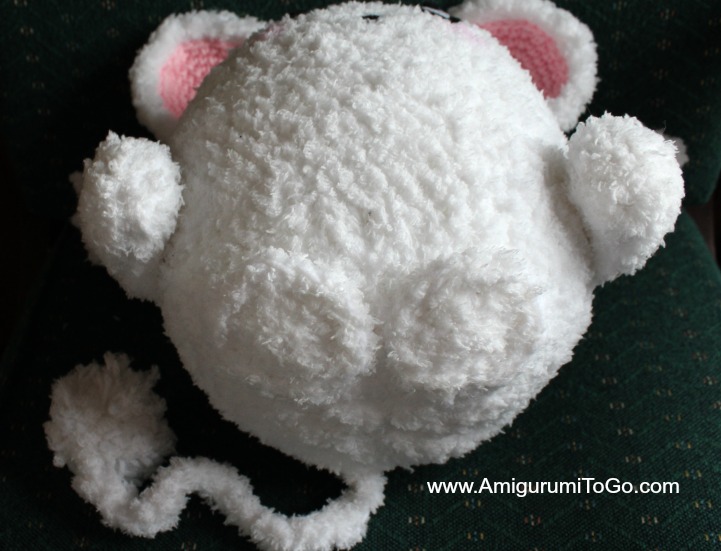
NOTE: The tail can be sewn to the body as is. I added a super soft pom pom to the end by making one with reg yarn and pipsqueak yarn held together. I wrapped around 3 fingers about 30 times. I do have a video showing how to make this kind of pom pom using just your fingers here. You don't need to add the pom pom though, this part was really just an add on for my mother who find mice tails creepy. Please be aware that pom poms are unsafe for small children. The fibers can be pulled out and become a choking hazard.
Wings holding reg yarn and pipsqueak yarn together:
NOTE: You can make 2 and sew those onto the body. I prefer making 4 then sewing 2 wing pieces together. That way they do not curl and they stand up nicely on their own. You decided what's best for you. If you have troubles understanding this part of the pattern, I do have another set of wings made similar for another pattern. There's a video tutorial for them. The part that's the same as these ones is how to crochet 2tog up the left side and how to sew 2 wing pieces together. Here
1) ch 9
2) start in 2nd ch from hook, 1sc in each ch across (8) ch1 turn,
3) skip ch, 1sc in next 6st, ch1 turn
4) skip ch, 1sc in next 6st, ch1 turn
5) skip ch, 1sc in next 4st, ch1 turn
6) skip ch, 1sc in next 4st
continue up the edge to the left, 2tog twice and f/o leaving a long tail for sewing
Halo: Holding yellow yarn and golden thread (if you have some) together and a 4mm hook.
NOTE: You can make a single chain and f/o or do what I did, add another row then sew it around a wire. I think either way is just as good.
1) ch25
2) starting with 2nd ch from hook, 1sc in each ch (24)
f/o leaving a very long tail for sewing.
Place a wire in the center leaving a bit hanging over on each end. Loop each end so they don't poke you while you are stitching the piece closed. It's a bit awkward stitching it because it's almost too narrow to close but do your best, using you yarn needle just go through the outer loops on each side and pull tight. Then bend the piece to form a loop and sew the ends together closing circle. Bend the wire ends, twist them together and trim. Leave about an inch or so that you can push into the head.


ASSEMBLY:
Use bobby pins if you have them, they work the best on this project. Pin everything in place before sewing. Please pin first! I rushed mine a bit and ended up have to remove the arms and wings as I sewed them on a bit wonky.
Removing parts from a piece made with fluffy yarn is very difficult once sewn on, so take your time in pinning then viewing from different angles before sewing. You will be happier with the end product!
1) sew the arms on. I sewed the open end to the body first then also added a few holding stitches just under the "hand" part to keep the arms from flaring outwards.
2) sew the ears on. These will be a bit floppy while sewing so take your time. They are in line with the arms.
3) sew on halo. Depending on which halo you made will determine how it's sewn on. Mine was made with wire. I sewed the stem of the wire to the head and left the front of the halo free of stitches so it stands up a bit off of the head.
4) sew on the wings. See how the arms and ears are pretty much in line with each other and the wings are behind those a bit.
5) sew the legs on. I sewed them very close to the front of the doll and left the very front of the legs free of stitches, sewing only the back part to the body. Again, pin these on first! Then stand the doll up and see how it looks before sewing.
6) sew the tail on

7) Do the face. I left the face for last. It's much easier to center the face once all the other parts have been sewn on. You can do whatever you want with the face. I kept mine simple but the finishing touches are totally up to you. I cut 2 larger pieces of black felt, 2 medium pieces of white felt and 2 small pieces of black felt to make up the eyes. These are all hot glued together then hot glued to the doll. Play around with the eye placements before gluing. Once hot glue touches yarn it will not come off so do this part very carefully and use very little glue.
The mouth is one strand of black yarn.
I used a q-tip to rub on some blush to add a bit of color to the cheeks.

And you're done. Now hug your Angel Mouse :)
Copyright Sharon Ojala - Amigurumi To Go All rights reserved
OMG!!! This is soo adorable!!! I've got a ball of fluffy white wool and couldn't decide what to do with it, now I know.
ReplyDeleteAnother fabulous creation Sharon.
Hugs
Buffy x
I believe it was this year you started a small white mouse, or did I dream it. I remember at the time said was still in progress but not heard anything. It was so adorable and I for one been watching and waiting. Happy New Year to you and family. I did mange to get my Christmas orders out and now have more because more ppl saw them. Will send you my thank you gift. It sure has kept my mind off grieving and knowing children will enjoy them so much.
ReplyDeleteI think you're speaking of a small white rat I made my son? That was never going to be a pattern as there were some parts I made, like the tiny hands with fingers, that would be too hard to explain in written form. I did share it here on my blog.I think that's what you're thinking of. OR it could be a tiny mouse I made that goes along with my Lil Trouble Teddy series? If so, that one I'm actually working on this very day, lol I have 2 patterns coming out before 2017... one day left to get these posted!
DeleteThank you so much for the very generous donation, I appreciate it a whole lot!
Yes, paypal takes a bit off the top but I can transfer to my bank for free so that's one consolation. Thank you very much again!
I'm so glad you have been enjoying the patterns and working through this time of grief. I'm thrilled to know children will enjoy the things you have made. Thanks for letting me be a part of it by using my patterns. That always brings me a whole lot of joy.
All the best to you in 2017!
Sharon