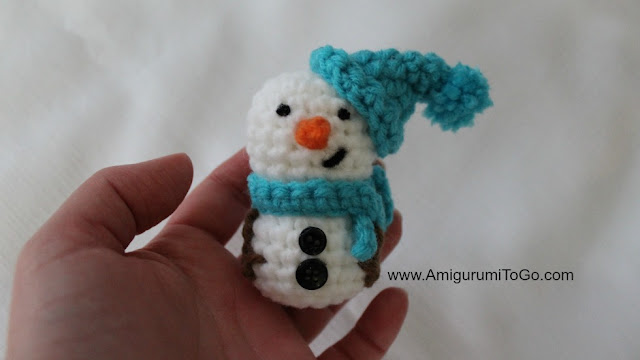
This little guy is about 3 inches tall. Makes a great tree ornament or stocking stuffer, could also hang it off of a gift. Add it to a winter wreath. There's many possibilities for this little snowman. I hope you enjoy making him!
How To Print The Pattern:
Use the free service found here.
How to read the rows: Each row has a sequence as given below. Example: 1sc then 2sc in next st means repeat that sequence 1sc then 2sc in next st followed by 1sc then 2sc in next st over and over to the end of that particular row. The number inside the parentheses ( ~ ) is the number of stitches you should have at the end of that particular row. Add in a marker at the end of row 2 and move that marker at the end of every row.
Supplies:
worsted weight yarn in white and small amounts in any color for the rest of the parts. You won't use much, this is a 3 inch amigurumi.
3.75mm hook ~ feel free to use a larger hook, use the same hook I did to get the same size snowman
blunt end yarn needle for sewing
scissors
small amount of polyester stuffing
optional ~ buttons for decorating and glue
I used buttons on the belly and black paint for the eyes
Abbreviations:
st = stitch
sc = single crochet
sl st = slip stitch
hdc = half double crochet
FLO = front loops only
f/o = finish off
With 3.75mm hook. Starting at the top of the head:
1) magic circle with 6sc (6)
2) 2sc in each st (12)
3) 2sc in next 2st, 1sc in next 4st, 2sc in next 2st then 1sc in next 4st (16)
4-8) 1sc in each st for 5 rows
9) 1sc in next 2st then 2tog (12) if you start to see gaps then decrease in the FLO
10) 1sc in each st for 1 row
11) 1sc then 2sc in next st (18)
stuff head. Shape as you stuff.
2-15) 1sc in each st for 4 rows
16) 1sc then 2tog (12)
stuff some into body. Shape as you stuff.
17) 1sc in next 2st then 2tog (9)
f/o leaving a tail long enough to sew up the gap. Weave in and out of the FLO of the remaining st. Before you close the gap, stuff the rest of the body and shape as you stuff. Use a stuffing stick, your finger or the back end of a pencil to push the stuffing into the right spots. Pull the yarn tail to close up the gap. Knot off and hide yarn tail inside body.
see FACE instructions below for where to put the eyes, mouth and nose and the order to do it all in.
Stick Arms: Make 2
1) ch 4
f/o leaving a tail for sewing.
See Assembly section below for sewing instructions
Nose:
1) ch3
2) starting with 2nd ch from hook, 1sc in next 2st (2)
f/o. You can leave the nose as is or do what I do, fold chain and sew the edges closed. That way you'll have a more carrot looking nose.
see FACE below for where and how to sew the nose in.
Hat:
1) magic circle with 6sc (6)
2-3) 1sc in each for 2 rows
4) 1hdc then 2hdc in next st (9)
5) 1hdc in next 2st then 2hdc in next st (12)
6) 1hdc in next 2st then 2hdc in next st (16)
7) 1sc in the FLO for 1 row
8) 1sc in next FLO then sl st next FLO. (yes, we use only 2st in this row)
f/o leaving a long tail for sewing
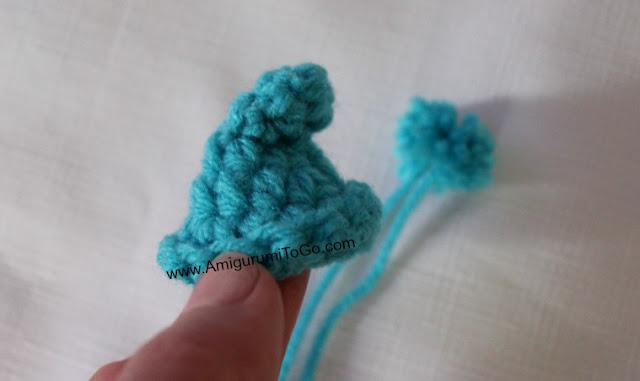
Fold the last row upward, it should naturally fold where you crocheted in the FLO.
Use the yarn tail to sew the edge in place if needed, then bring the yarn tail up through the tip of the hat and sew the tip of the hat downwards as pictured.
Sew the pom pom to the tip and hide yarn tails inside hat
POM POM:
I made a small pom pom by wrapping yarn around 2 fingers 15 times, cut free. Wrap a single strand of yarn around the middle of the wrap and knot off. Cut through all the loops then trim the strands short. Do not cut the strand of yarn that you knotted the wrap with. Use these 2 strands to sew the pom pom to the hat.If you've never made a pom pom this way before, I do have a video showing the steps on making a larger one here
Scarf:
1) ch29 wrap the chain around the neck and see how long it is. It tends to be longer with some colors of yarn and shorter for other colors. If it's too long then remove a chain or 2.
2) starting with the 2nd ch from hook, 1sc in each ch (28)
f/o leaving a bit of a yarn tail for sewing. See Assembly instructions below for what to do with the yarn tails
ASSEMBLY:
1) sew on stick arms:
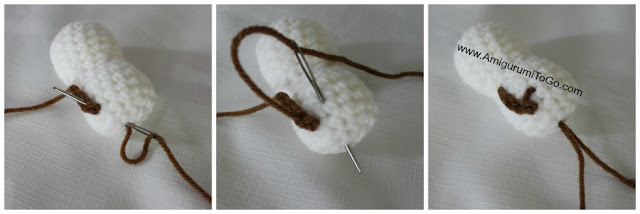
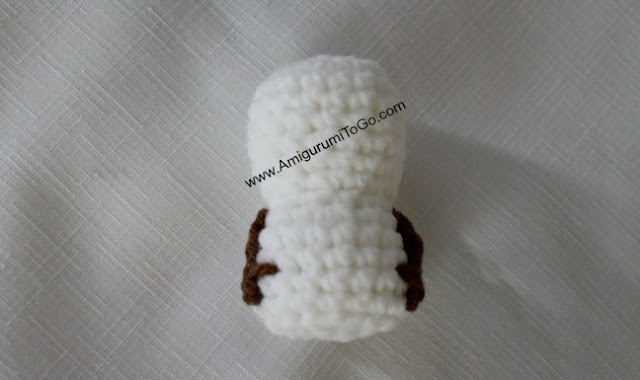
Sew the bottom end in between the 14th and 15th row, use the yarn tail to add in another tip to the *stick* as pictured by wrapping over 2 times. I put that one in between the 13th and 14th row.
Add one more stitch in the middle of the stick, pushing the stick over just a bit to make it look bent.
Bring the yarn tail out through the bottom of the snowman and leave it hanging. Sew the top end in between the 10th and 11th row.
Bring the yarn tail out through the bottom of the body, through the same stitch hole the first yarn tail is, and knot them together. Cut yarn tails up a bit shorter and hide the knot in the body.
2) Add the scarf:
Weave in one yarn tail and cut the excess off. Weave the other yarn tail up about 1/4 way up the scarf and use it to sew the scarf in place. Wrap the scarf around the neck, crossing the ends over each other. Do this step after you have the stick arms sewn on.
3) Sew hat in place, off center, as pictured.

4) Glue the buttons to the belly. I used hot glue. Be very careful with this if you use hot glue, the glue will not come off yarn so use very little, just a drop will do! I found placing the button on a pin then adding in a drop of glue helped keep my fingers out of harms way. I actually put the glue on the end of the pin, then used the pin to guide the button in place. I pushed the button off of the pin and it grabbed the glue on its way off. No mess that way!
5) Add the face now. I leave the face for last since I use paint. You want to be completely sure the paint is dry before doing anything with the doll. PLEASE note, these are suggestions only. If something doesn't look right to you then change it! Do what you think looks best.
5a) The nose is sewn in between the 5th and 6th row. Pull the yarn tails through the back of the head. You can add a dot of glue behind the nose before pulling the yarn tails tight. Knot off, cut up a bit shorter then hide the knot inside the head.
5b) Add the smile. Insert black yarn in between the 7th and 8th row, off center, then bring the yarn up and over just a bit in between the 6th and 7th row. Bring the yarn tails out through the bottom of the body and knot off. Cut up shorter and hide knot inside body.
5c) Add in the eyes. I used black paint and dotted them in between the 4th and 5th row with about 3 visible stitch holes between them. Feel free to use whatever you want for eyes. I found paint quick and easy and you can make them the perfect size.
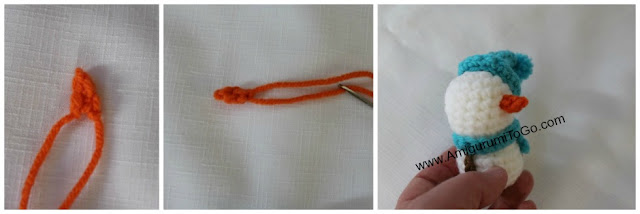
And lastly, add a string to the top of the head. Although it looks pretty darn cute in the tree, I'm sure there's other places the snowman could go, the tree isn't it's only purpose in life.
Have fun with it!
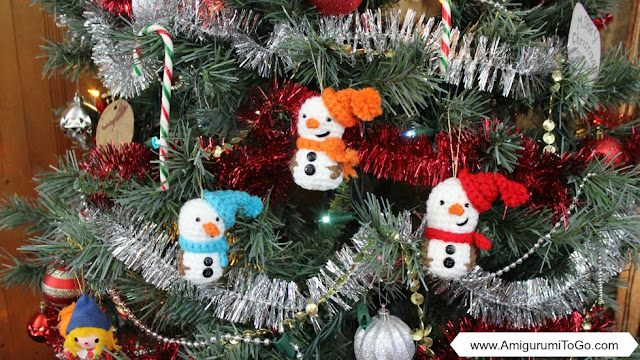
And now you're done. I hope you enjoyed the pattern. Post pictures on my facebook page Amigurumi Freely. Or post them on instagram with the hashtag Sharon_Ojala.
Copyright 2016 Author: Sharon Ojala - Amigurumi To Go All rights reserved


Glad to hear from you. Hopefully the rusty feeling is all gone. These snowmen are funny little guys. Thanks so much for the pattern.
ReplyDeleteI wish you a Merry Christmas and Happy New Year, Margaret
Hi, I love this cute snowman! But I found a mistake in row three of the head: It has to be: 2sc in next 2st, 1sc in next 4st, 2sc in next 2st (!) then 1sc in next 4st :o) Kind regards from Germany, Marion :o)
ReplyDeleteyes!! Thank you so much..
DeleteWhat a sneaky mistake, lol I went over it a number of times too and never saw that. I'm so glad you let me know. I've updated the row :)
Sharon
sharon i love it!!!!!!!!!!!!!!!!!!!!!!
ReplyDeleteOh what a wonderful day! I look for new patterns from you all the time. I'm so happy that you were able to make one. Woohoo for us. He looks so fun. Thank you so much, I hope to see more soon. 😀👏👏👏💕❤️❤️
ReplyDeleteI've missed ur awesome creations more than u knw!!! Thnks for all u do & all ur hard wrk. If I was a millionaire I'd donate tons of $& to u. Miss u on YouTube plz come back when u have the chance. Love ur projects!!!
ReplyDelete